LaTeX/Presentations
Beamer is a LaTeX class for creating slides for presentations. The name is taken from the German word Beamer, a pseudo-anglicism for video projector.
It has special syntax for defining 'slides' known in Beamer as 'frames'. Slides can be built up on-screen in stages as if by revealing text that was previously hidden or covered. This is handled with PDF output by creating successive pages that preserve the layout but add new elements, so that advancing to the next page in the PDF file appears to add something to the displayed page, when in fact it has redrawn the page.
Beamer provides the ability to make 'handouts', that is a version of the output suitable for printing, without the dynamic features, so that the printed version of a slide shows the final version that will appear during the presentation. For actually putting more than one frame on the paper, pgfpages package is to be used.
An "article" version is also available, rendered on standard sized paper (like A4 or letter), with frame titles used as paragraph titles, no special slide layout/colors, keeping the sectioning. This version is suitable for lecture notes or for having a single source file for an article and the slides for the talk about this article.
Sommaire
All you need to know about Beamer
First example
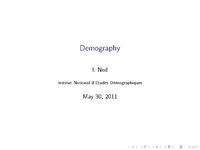
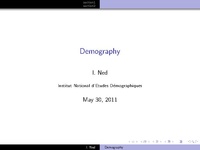
Let's start with a simple 3 slides presentation including one for the title.
\documentclass{beamer}

\title{Demography}
\author{I. Ned}\institute{Institut National d'Etudes D\'emographiques}


\begin{document}

\begin{frame}
\titlepage
\end{frame}

\begin{frame}
Text located on the first content slide
\end{frame}

\begin{frame}
Text located in the second content slide
\end{frame}

\end{document}
Step by step
Like any other LaTeX structured documents, the TeX code of a Beamer presentation starts with the Document Class Declaration:\documentclass{beamer}
and it is enclosed between:
\begin{document}
....
\end{document}
The only new thing only new thing with Beamer is that each slide is enclosed between the two commands which identify the beginning and end of the slide:
\begin{frame}
....
\end{frame}
You can add some package just after the Document Class Declaration. Once you know TeX general commands, it is very easy to make a Beamer presentation. So if you read carefully the previous sections, you just need to adapt this Beamer example.
Beamer is very flexible and allow you to do almost everything (except coffee...). In this section, we only present very general commands.
Few more things about Beamer
Titles
General title
Example
We already used this example (See Structure)
\documentclass{beamer}  % For a Beamer presentation
\usepackage[utf8x]{inputenc}

\begin{document}
% Article information
\title[Complete-simple distributive lattices]
{A construction of complete-simple\\ distributive lattices}

% Author information
\author{
  George~A. Menuhin
   \thanks{  \texttt{gmen@ccw.uwinnebago.edu}
     Computer Science Department,
     University of Winnebago, Winnebago, MN 53714.
    The research was supported by the NSF under grant number 23466.}
and
   Ernest~T. Moynahan
    \thanks{\texttt{h1175moy\%ella@relay.eu.net}
       Mathematical Research Institute
       of the Hungarian Academy of Sciences,
       Budapest, P.O.B. 127, H-1364,
       Hungary. The research  was supported by the Hungarian National Foundation
       for Scientific Research, under Grant No. 9901.}
}
\date{\today}
\maketitle
\end{document}
Logo
You can add the logo of your institution (for example ) using:
\logo{\includegraphics[height=10mm]{logoined.jpg}}
An example:
\documentclass{beamer}

\title{Demography}
\author{I. Ned}\institute{Institut National d'Etudes D\'emographiques}

\logo{\includegraphics[height=10mm]{logoined.jpg}}         % logo


\begin{document}

\begin{frame}
\titlepage
\end{frame}

\begin{frame}
Text located on the first content slide
\end{frame}

\begin{frame}
Text located in the second content slide
\end{frame}

\end{document}
Slide title
The command to give a slide a title is: \frametitle{mytitle}
\begin{frame}
\frametitle{mytitle}
Text located on the first content slide
\end{frame}
Sectioning Commands and Table of Contents
You can use the usual sectioning commands and get the table of contents:
\documentclass{beamer}

\title{Demography}
\author{I. Ned}\institute{Institut National d'Etudes D\'emographiques}


\begin{document}

\begin{frame}
\titlepage
\end{frame}

\begin{frame}              % slide with the table of contents
\frametitle{Outline}
\tableofcontents
\end{frame}

\section{section1}         % section
\subsection{section1.1}    % subsection
\begin{frame}
\frametitle{SlideTitle}
Text located on the first content slide of the first section first subsection
\end{frame}

\subsection{section1.2}
\begin{frame}
Text located on the first content slide of the first section second subsection
\end{frame}

\begin{frame}
Text located on the second content slide of the first section second subsection
\end{frame}


\section{section2}
\begin{frame}
Text located in the first content slide of the second section
\end{frame}

\begin{frame}
Text located in the second content slide of the second section
\end{frame}

\end{document}
Importing graphics
Overlays
The content of your slides can appairs incrementally. Elements of a slide can be temporarily hidden.
Pause
You can place the \pause command between the part of the slide you want to show up separately. \pause create multiple separate slides. The first slide displays the information contained above the first \pause, the second slide displays the information down to the second \pause, and so on.
\begin{frame}
\begin{itemize}
\item \textbf{Question:} What do demographers do?\\
\pause  % command pause
\item \textbf{Answer:} Demographers study populations to determine
their size and composition and to predict how they are likely to
change in years to come. In all countries, this knowledge is key
to meeting the population's present and future needs, for example,
to decide how many new kindergartens, schools or retirement homes
are needed. Demographers analyse data collected by the national
statistical offices (INSEE in France) and organize surveys on
specific themes.
\end{itemize}
\end{frame}
Line command
Overlays specifications are given in pointed brakets (< >) and indicate which slide the corresponding information should appear on.
- <1-> means "display from slide 1 on"
- <1-3> means "display from slide 1 to slide 3"
- <-2,4-5,7-> means "display on all slides except slides 3 and 6
\begin{frame}
\begin{itemize}
\item<2> First line
\item<2-3> Second line
\item<1,3,5> Third line
\item<-2,4-5> Forth line
\end{itemize}
\end{frame}
Word command
Commands \only<1>{} and \uncover<2>{} allow you to only show some elements on a line.
- \only<1>{text1}: text1 only appear on slide 1
- \uncover<2>{text2}: text2 only appear on slide 2
\begin{document}
\begin{frame}
\begin{itemize}
\item Quand \only<1>{je mets \`a vos pieds un  \'eternel hommage}
\item Voulez\only<1>{-vous qu'un instant je change de visage ?}
\item Vous \only<1>{avez captur\'e les sentiments d'un cour}
\item Que \only<1>{pour vous adorer forma le Cr\'eateur.}
\item Je \only<1>{vous ch\'eris, amour, et ma plume en d\'elire}
\item Couche \only<1>{sur le papier ce que je n'ose dire.}
\item Avec \only<1>{soin, de mes vers lisez les premiers mots}
\item Vous \only<1>{saurez quel rem\`ede apporter \`a mes maux.}
\only<1>{\item Bien \`a vous, Eric Jarrigeon}\\
\end{itemize}

 \uncover<2>{\textit{Lettre d'Alfred de Musset \`a George Sand}}
\end{frame}
\end{document}
Hidden parts in grey
By default, hidden parts are invisible. It is possible to get them in grey using
\setbeamercovered{transparent}
Hyperlink
You can use hyperlinks in your Beamer presentation to go back to a previous slide or to skip slides. You should define a label pointing on the frame (\label{titelabel}). On the frame where the link "Return to the title" is created, \hyperlink{titelabel}{Link to the title} points to the frame labeled "titelabel". A button can be created using \beamerbutton{}.
\documentclass{beamer}
\title{Demography}
\author{I. Ned}\institute{Institut National d'Etudes D\'emographiques}

\begin{document}

\section[short]{long}
\begin{frame}
\titlepage
\label{titelabel}                                           % label
\end{frame}

\begin{frame}
Text located on the first content slide
\end{frame}

\begin{frame}
\hyperlink{titelabel}{\beamerbutton{Return to the title}}    % hyperlink
\end{frame}

\end{document}
Background
Color
Beamer colors can be changed using \setbeamercolor{}. You can choose a foreground (fg) color and a background (bg) color. For example:
- \setbeamercolor{normal text}{fg=red,bg=blue}: background in blue, text in red
Image
You may prefer to choose your own slide template background. You just need to import your images (here called "insee" ) using:
\pgfdeclareimage[height=96mm,width=128mm]{name}{insee}
\setbeamertemplate{background}{\pgfuseimage{name}}
You can get slides like this:
\documentclass{beamer}
\setbeamercolor{normal text}{fg=yellow}
\pgfdeclareimage[height=96mm,width=128mm]{name}{insee}
\setbeamertemplate{background}{\pgfuseimage{name}}
\begin{document}
\begin{frame}
France's National Institute of Statistics and Economic Studies
(Institut National de la Statistique et des Études Économiques: INSEE)
is a Directorate General of the Ministry of the Economy, Finance, and Industry.
It is therefore a government agency whose personnel are government employees, although
not all belong to the civil service. INSEE operates under government accounting rules:
it receives its funding from the State's general budget.
\end{frame}
\end{document}
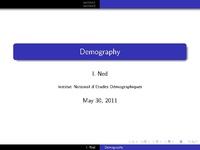
Beamer themes
You can create your how beamer template defining color and style of every element. It is also possible to use existing beamer theme: you just need to add one line to enjoy well-known Beamer presentation templates (two if you want to change the colors).
- \usetheme{ } to choose the built-in theme. It is often named after cities (e.g. Warsaw, Darmstadt...)
- \usecolortheme{ } to choose the color theme. It is often named after animals (e.g. Beaver, Seahorse...). You can keep the default color theme.
By default, we apply the different themes on this example:
\documentclass{beamer}


\title{Demography}
\author{I. Ned}\institute{Institut National d'Etudes D\'emographiques}


\begin{document}

\begin{frame}
\titlepage
\end{frame}

\begin{frame}              % slide with the table of contents
\frametitle{Outline}
\tableofcontents
\end{frame}

\section{section1}         % section
\subsection{section1.1}    % subsection
\begin{frame}
\frametitle{SlideTitle}
Text located on the first content slide of the first section first subsection
\end{frame}

\subsection{section1.2}
\begin{frame}
Text located on the first content slide of the first section second subsection
\begin{itemize}
\item A
\item B
\item C
\end{itemize}
\end{frame}

\begin{frame}
Text located on the second content slide of the first section second subsection
\begin{enumerate}
\item A
\item B
\item C
\end{enumerate}
\end{frame}


\section{section2}
\begin{frame}
\frametitle{SlideTitle}
Text located in the first content slide of the second section
\begin{block}{Normal bloc}
Text
\end{block}
\begin{alertblock}{Alert block}
Text
\end{alertblock}
\begin{exampleblock}{Example block}
Text
\end{exampleblock}
\end{frame}

\begin{frame}
\frametitle{SlideTitle}
Text located in the second content slide of the second section
\end{frame}

\end{document}
Warsaw
Warsaw Theme (with default color theme)
You just need to add the command:
\usetheme{Warsaw}
like this:
\documentclass{beamer}

\usetheme{Warsaw}            %Theme

\title{Demography}
\author{I. Ned}\institute{Institut National d'Etudes D\'emographiques}


\begin{document}

\begin{frame}
\titlepage
\end{frame}

\begin{frame}
\frametitle{Outline}
\tableofcontents
\end{frame}

\section{section1}
\subsection{section1.1}
\begin{frame}
\frametitle{SlideTitle}
Text located on the first content slide of the first section first subsection
\end{frame}

\subsection{section1.2}
\begin{frame}
Text located on the first content slide of the first section second subsection
\begin{itemize}
\item A
\item B
\item C
\end{itemize}
\end{frame}

\begin{frame}
Text located on the second content slide of the first section second subsection
\begin{enumerate}
\item A
\item B
\item C
\end{enumerate}
\end{frame}


\section{section2}
\begin{frame}
\frametitle{SlideTitle}
Text located in the first content slide of the second section
\begin{block}{Normal bloc}
Text
\end{block}
\begin{alertblock}{Alert block}
Text
\end{alertblock}
\begin{exampleblock}{Example block}
Text
\end{exampleblock}
\end{frame}

\begin{frame}
\frametitle{SlideTitle}
Text located in the second content slide of the second section
\end{frame}

\end{document}
Result:
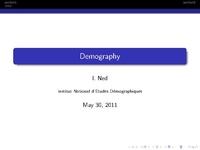
Warsaw Theme (with Dolphin color theme)
You can use another color theme like "dolphin" using the command \usecolortheme{dolphin}:
\documentclass{beamer}

\usetheme{Warsaw}
\usecolortheme{dolphin}    %Color Theme

\title{Demography}
\author{I. Ned}\institute{Institut National d'Etudes D\'emographiques}


\begin{document}

\begin{frame}
\titlepage
\end{frame}

\begin{frame}
\frametitle{Outline}
\tableofcontents
\end{frame}

\section{section1}
\subsection{section1.1}
\begin{frame}
\frametitle{SlideTitle}
Text located on the first content slide of the first section first subsection
\end{frame}

\subsection{section1.2}
\begin{frame}
Text located on the first content slide of the first section second subsection
\begin{itemize}
\item A
\item B
\item C
\end{itemize}
\end{frame}

\begin{frame}
Text located on the second content slide of the first section second subsection
\begin{enumerate}
\item A
\item B
\item C
\end{enumerate}
\end{frame}


\section{section2}
\begin{frame}
\frametitle{SlideTitle}
Text located in the first content slide of the second section
\begin{block}{Normal bloc}
Text
\end{block}
\begin{alertblock}{Alert block}
Text
\end{alertblock}
\begin{exampleblock}{Example block}
Text
\end{exampleblock}
\end{frame}

\begin{frame}
\frametitle{SlideTitle}
Text located in the second content slide of the second section
\end{frame}

\end{document}
Result:
Darmstadt
\usetheme{Darmstadt}
The slide position is given by a series of points:
Result:
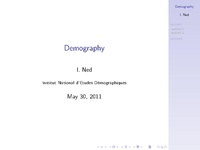
Goettingen
\usetheme{Goettingen}
With Goettingen theme, the sidebar is on the right side.
Result:
Beamer Theme Matrix
A selection of theme and color theme combinations:
FAQ
Size problems
Equations are sometimes to long to fit on one line. You can reduce their size.
\documentclass{beamer}

\begin{document}
\begin{frame}
Default :
\begin{equation} A = B + C + D + F + G + H + I + J + K + L + M + N + O + P + Q + R + S + T + U + V \end{equation}
Small:
{\small\begin{equation} A = B + C + D + F + G + H + I + J + K + L + M + N + O + P + Q + R + S + T + U + V \end{equation}}
Footnotesize:
{\footnotesize\begin{equation} A = B + C + D + F + G + H + I + J + K + L + M + N + O + P + Q + R + S + T + U + V \end{equation}}
Scriptsize:
{\scriptsize\begin{equation} A = B + C + D + F + G + H + I + J + K + L + M + N + O + P + Q + R + S + T + U + V \end{equation}}
Tiny
{\tiny\begin{equation} A = B + C + D + F + G + H + I + J + K + L + M + N + O + P + Q + R + S + T + U + V \end{equation}}
\end{frame}
\end{document}
You can also change the font size of the whole document (by default 11pt, at the full screen mode this font size corresponds to 22 pt) using:
\documentclass[8pt]{beamer}
Tutorials
- User Guide
- Tutorial (French)
- Beamer tutorial [http:faq.ktug.or.kr/wiki/uploads/beamer_guide.pdf lien]